> For the complete documentation index, see [llms.txt](https://docs.multiset.ai/llms.txt). Markdown versions of documentation pages are available by appending `.md` to page URLs; this page is available as [Markdown](https://docs.multiset.ai/fundamentals/third-party-scans/360-videos.md).
# 360 Videos
Build a VPS map from 360° video: raw .insv from an Insta360 camera or the Antigravity A1 drone, or a stitched equirectangular .mp4 from any other camera.
MultiSet builds VPS maps from **360° video**, so a space can be mapped with a consumer camera and no LiDAR or SLAM hardware. One continuous recording produces one map, and 360 video is the only input that yields the complete set of [output assets](/fundamentals/maps/output-asset.md): a mesh, a Gaussian Splat, and a navigable panoramic tour of the same space.
## Pick your route
| Capture | What you upload | Guide |
| ----------------------------------------------- | ------------------------------- | -------------------------------------------------------------------------------------------- |
| **Hand-held Insta360** (X4, X5) | Raw `.insv` | [Insta360 Scans](/fundamentals/third-party-scans/360-videos/insta360-scans.md) |
| **Antigravity A1**, the 360° camera drone | Raw `.insv` | [Antigravity A1 (Drone)](/fundamentals/third-party-scans/360-videos/antigravity-a1-drone.md) |
| **Any other 360 camera**, ground based or flown | Stitched equirectangular `.mp4` | [Equirectangular MP4](/fundamentals/third-party-scans/360-videos/equirectangular-mp4.md) |
Upload the **raw `.insv`** wherever you have it. MultiSet stitches it server-side with its own parameters, which preserves more detail than re-ingesting a vendor's stitch. Every other camera exports a **stitched equirectangular `.mp4`** and uploads that instead.
## What every route shares
* **One video, one map.** Exactly one video file per `.zip`, and each `.zip` must stay **under 50 GB**. Split a large site into several captures and join the resulting maps with [MapSet : Multiple Maps](/fundamentals/mapset-multiple-maps.md).
* **Continuous motion.** No stops, no pivots in place, no paused recordings mid-capture. Move steadily, turn in wide arcs, and **close the loop** by returning to where you started.
* **Level at the start.** Hold the camera upright and level when you press record, on the ground and in the air, so the map is built with gravity aligned. See [Start upright so gravity is aligned](#start-upright-so-gravity-is-aligned).
* **Locked exposure.** Fix the shutter (indoors) and the white balance before you press record. Auto exposure is the single biggest cause of grey, smeared reconstructions.
* **Metric scale.** Either include a printed **ChArUco marker** in the scene, or set the scale after processing with [Map Scale](/fundamentals/rest-api-docs/map-scale.md). Drone and stitched-video captures use the second route, since a printed board cannot be resolved from the air.
* **360 mode only.** Flat, single-lens, and stereoscopic (over-under or side-by-side) footage is rejected.
## Start upright so gravity is aligned
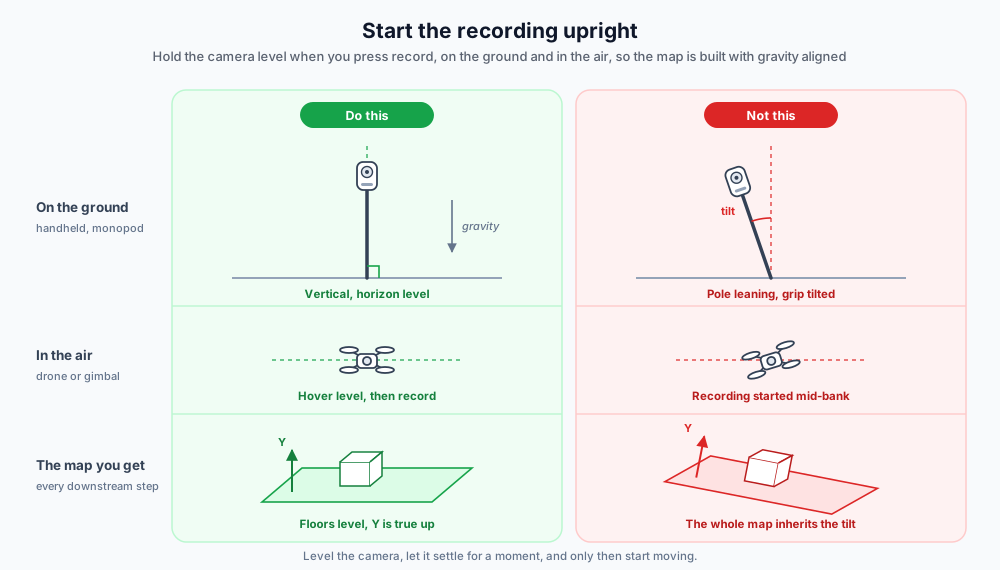
MultiSet establishes the map's up axis from the start of the capture, so the camera has to be level at that moment. Level it before you press record, and give it a second or two to settle before you start moving. This applies to every route: handheld, monopod, and drone.
Level on the ground and level in the air. The tilt you start with is the tilt the map keeps.
Start with the camera tilted and the whole map is built tilted. Floors are not flat in map space, walls are not vertical, and every later step inherits the error:
* Content authored on the floor floats at one end of the room and sinks at the other.
* [HintFloorHeight](/fundamentals/localization/hint-floor-height.md) bands stop lining up with real floors, because a flat Y band now cuts diagonally through the building.
* [Georeferencing](/fundamentals/georeferencing-maps.md) starts from a tilted frame, so heading and altitude are off.
* Mesh and splat exports are unreliable for measurement, and unusable as a floor for navigation.
| Capture | What to do at the start |
| ------------------- | -------------------------------------------------------------------------------------------------------------------------------------- |
| **Handheld** | Hold the camera plumb, not angled toward the ceiling or the floor. Keep your wrist neutral and let it settle before the first step. |
| **Monopod or pole** | Stand the pole vertical at the start point. A pole resting on your shoulder or leaning into your stride begins the capture tilted. |
| **Drone** | Take off, hover, and let the aircraft stabilise level before the clip starts. Do not begin recording while climbing out or banking in. |
{% hint style="warning" %}
Getting this right at capture time is far easier than dealing with it afterwards. It costs a couple of seconds at the start of the walk or the flight.
{% endhint %}
Allow up to one hour for processing. You will receive an email notification once the map is ready.
---
# Agent Instructions
This documentation is published with GitBook. GitBook is the documentation platform designed so that both humans and AI agents can read, navigate, and reason over technical content effectively. Learn more at gitbook.com.
## Querying This Documentation
If you need additional information that is not directly available in this page, you can query the documentation by asking a question.
Perform an HTTP GET request on the following URL with the `ask` and `goal` query parameters:
```
GET https://docs.multiset.ai/fundamentals/third-party-scans/360-videos.md?ask=&goal=
```
`ask` is the immediate question: it should be specific, self-contained, and written in natural language.
`goal` is what the user is ultimately trying to achieve, the reason they need the answer. Sharing it helps GitBook give you a better, more relevant answer. A goal is most helpful when it describes the outcome the user wants rather than restating the question. For example, with `ask=how do I create an API token`, a goal like `automate deployments from our CI pipeline` lets GitBook tailor the answer to that use case.
The response will contain a direct answer to the question and relevant excerpts and sources from the documentation.
Use this mechanism when the answer is not explicitly present in the current page, you need clarification or additional context, or you want to retrieve related documentation sections.